
I had the privilege of making a baby shower cake for a dear cousin-in-law and it turned out very well.
I didn’t have any special cake pans for the pregnant belly cake but I knew that it was possible with a few creative adjustments (and a bit of sculpting ^_^). I used mostly round pans and a small 3 inch steel bowl pan.I also wanted to make sure the frosting was one that the recipient likes to eat – so I chose to use mostly butter cream and cream frosting – of course there was a little fondant used.
Decided to share this simple picture tutorial so all you bakers and bakerettes can see that you can all be able to do the same as well – especially for those who don’t have the round soccer/football cake pans or belly cake pans.
This will be a long post due to the many pictures, but I promise it’s totally worth it!
Here we go.
What You’ll Need:
- Two – 3 inch round vanilla cakes
- One – 6 inch round vanilla cake
- One – 10 inch round vanilla cake
- Buttercream frosting – click here for a recipe
- Fondant – see below for recipe
- Cream Frosting (I used non-dairy Puratos Whippak) – 500mL + 200 mL
- Americolor Royal Blue – Gel Food Color – 1/8 teaspoon
- Yellow colored sugar crystals from Maimun Supplies (optional)
- One – 16 inch square cake board (I used a 14″ and the space was tight – get 16″)
- Large Icing Spatula
- Large Bread Knife
- 1 large icing/piping bag fitted with coupler and large open star tip no. 834
- 1 small icing/piping bag fitted with coupler and 4 small nozzles/tips (Ruffle/petal tip no.104, Open star tip no.18, Closed star tip no.20 & Round tip no.3)
- Rolling Pin
- Small knife
P/S: You don’t have to stick with the vanilla cake recipe for this tutorial, just use whatever cake flavor you would like. The same applies to the color of the cream frosting, I wanted a blue shade – you can choose pink, etc. As for the sugar crystals, it’s also another item you don’t really require, I just liked the garnish and color contrast on the cake.
Directions:
- Assemble your cakes on a tray or on the cake board plainly (no frosting yet) to arrange them and get an idea on how and where you will place them for decoration.

- Take your two 3″ cakes and using the bread knife, shave them into round shapes that are similar in size and proportional. Then first level the top of your 6″ cake and then torte it into two even pieces. Take the bottom half of the 6″ cake and cut out the middle part – leave about a 1″ outer edge of the half cake.
- Take all your cake pieces and assemble them on your cake board without any frosting to see if they fit well. To do this; start with the 10″ cake at the bottom, then place the top half of the 6″ cake (that was leveled), then arrange the 1″ outer edges of the bottom half around the 6″ cake. Finally place the two 3″ cakes above the round cakes to form the bust.

- When you’re satisfied with the shape of the cakes – especially the bust (make sure to shave and carve them to look as symmetrical as possible ^_^ ). You can now start assembly of the cake. Apply buttercream to the top of the 10″ cake and place the top half of the 6″ leveled cake.

- Assemble the bottom edge pieces around the top half of the 6″ cake and arrange as tightly as you can. This is to create a nice pregnant belly shape.
 Now apply a thick crumb coat around the top of the round cakes to hold the shape well; Make sure the frosting is as smooth as possible. Leave to set for about 10 to 15 minutes.

- Apply another coat of the buttercream frosting on the whole cake; the belly and the bust as well. Once again, try and make sure the frosting is as smooth as possible. Leave to set for at least half an hour to an hour.

- On a clean working surface, dust some cornstarch on the surface and roll out 3/4 of your fondant into a medium rectangle ( you can try and make sure it’s at least 5 inches wide and 8 inches long – to cover your bust all the way to the board). Drape your fondant on to the bust and shape it well with your hands to make sure it lies smooth and fits well. (P/s: Roll our your fondant on a very smooth surface, my fondant had a smoothness issue on the right side – but wasn’t too worried since I was going to cover it).

- Roll out the remaining quarter fondant and using a small knife, cut long strips to make the ribbons for your “belly dress” – you can choose to leave the edges straight or shape them like I did mine. If you want a ruffled look like I did, you can raise the ribbons with small items such as nozzles (innovation!) to get the ruffle; make sure to grease the nozzles with some glycerin or cooking oil so they don’t stick on the nozzles.

- In a large bowl; pour your 500 mL non-dairy cream and royal blue color, beat it with a mixer for about 3 minutes or until the cream forms soft peaks. Don’t over beat the cream, it will stiffen and get too many bubbles – it’ll be difficult to work with. Make sure to have chilled the cream beforehand. In a medium bowl; beat the 200 ml cream without color and set aside.

- Fill your large icing bag with the blue cream frosting and starting from the base of the cake; start piping large swirls (almost like rosettes) in a line around the belly part of the cake. Keep going round the cake as you progress upward until you have covered every part of the belly. You can then go filling the spaces in-between the swirls using the same star tip until there are no opens spaces left.
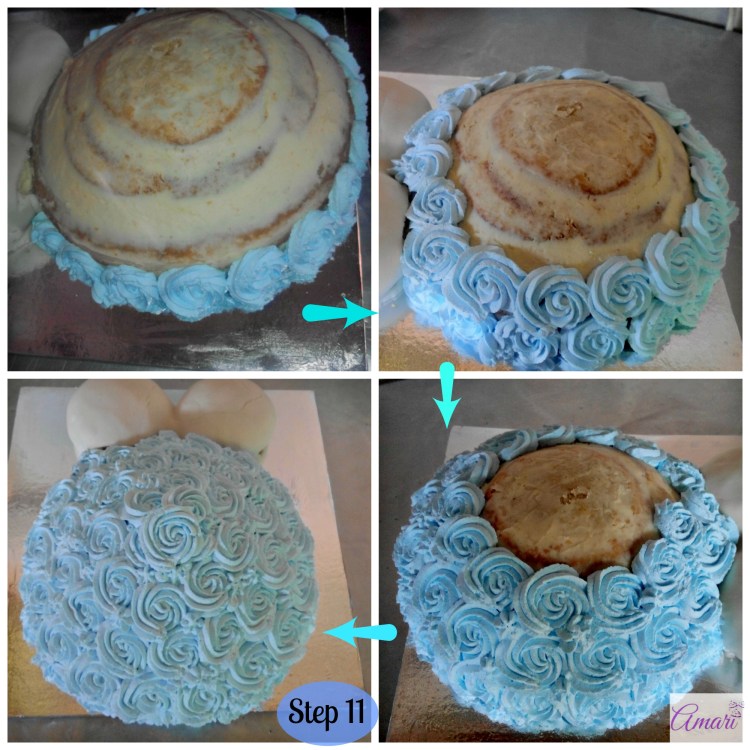
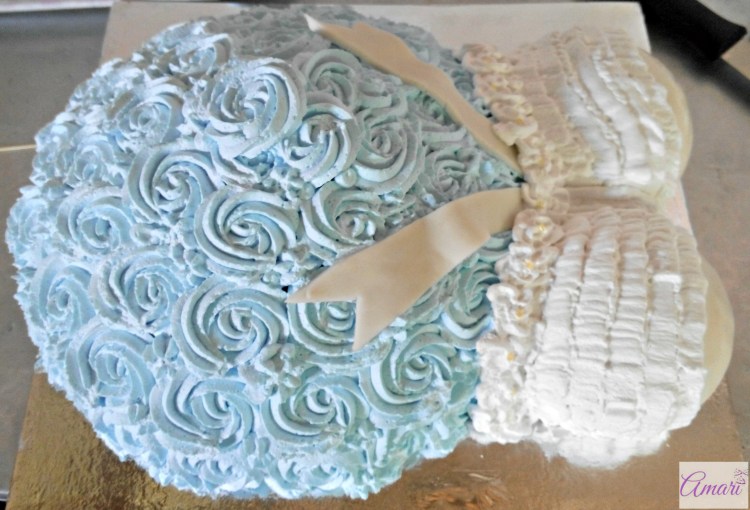
- To decorate the bust: using the ruffle/petal tip, pipe ruffles in a line starting from the inner side of the bust heading outward until the base of cake. I did five lines on each side to cover up, but still leave some “skin” space. The point was to make it look like a top/blouse ^_^. (see ‘A’ on the picture) Using the same ruffle tip; pipe two lines in between the bust on either side for a nice design (see ‘E’).

- Take your fondant ribbons and place them carefully on the cake; starting from where the middle of the bust and belly meet and arrange them to drape nicely on each side of the belly (see ‘B’ on the picture). Take your closed star tip and make nice round flowers from one end of the bottom bust to the other. The aim is to cover and decorate the junction between the bust and belly (see ‘C’ on the picture).
- Using the round tip, fill in any spaces that may have been left in between the ruffles. Also make sure you pipe a line at the base of the bust in the front where the fondant ends to give a neat finish. (see ‘D’). To garnish; you can place single yellow sugar grains in the middle of each of the flowers made with the closed star tips for a nice look (on ‘C’).
- Your pregnant belly cake is ready! If you want to include a nice message, be as creative as possible. Like I did, you can roll out remaining fondant from cutting out your ribbon strips and using a heart shape cookie cutter, cut out 5 hearts – you can do them in any other shape. Place the heart shapes on each side of your cake – on the bust side (more space). If you have space, you can also use the top and bottom parts as well. Then write your message using the small round tip no.3. I used the blue cream frosting to write “Bye Bye Tummy” – “Hello Mom” – choose whatever message suits the occasion or the client has requested.

- Voila! We are finally done with our beautiful pregnant belly cake – it’s ready for that fabulous baby shower.
Fondant Recipe
Ingredients:
- Icing Sugar – 2 1/2 cups
- Gelatin – 3/4 tspn
- Cold water – 1/8 cup
- Glycerin – 1/2 Tbspn
- Glucose Syrup – 1/8 cup
- Flavoring (clear) – 1/2 tspn
- Corn Starch – for dusting
- Hot Water Bath (boiled steaming water in a medium bowl-shallow depth)
Sift the icing sugar in a plastic medium bowl, create a well in the middle and set aside. In a small bowl, measure the cold water and sprinkle the gelatin on top, put aside and let it set for about 2 to 3 minutes. Measure the glucose syrup and pour into the small bowl with gelatin. Then measure and add the clear essence and glycerin into the same bowl. Take the small bowl and put it into the hot water bath and slowly stir the contents until clear and well mixed into a liquid. Pour the syrup mix into the well in the icing sugar and using your hands, start mixing the icing sugar. Knead the mixture until it comes together well and forms a small ball. Cover the fondant with cling film and set it aside for a day or two to age.
If you try this cake out, let me know what you think below on the comments section.Thanks.
Please share this recipe and help out another baker or bakerette – Happy Decorating ^_^
Would you like to start learning how to bake & decorate cakes? Our May Basic Cake Making & Decoration short course is starting this coming May. Click here to find out more about our classes and schedules.

Lovely thanks for giving us this tips. Am loving it God bless you.
LikeLiked by 1 person
Thanks Lydia! Very welcome try it out soon and share how it comes out ^_^
LikeLike
Perfect. I just love this.
LikeLiked by 1 person
Thanks Paul ^_^
LikeLike