This is a popular themed cake for birthday cakes – Teenage Mutant Ninja Turtles! 
So when I got a request to do this cake, about a week ago, for a small boy; I was definitely up to the challenge. I have decided to share the step by step method in which I used to decorate the cake using fondant. I know for a lot of new or home bakers; fondant can be a challenge, but once you learn how to make it and tips on using it – it becomes a bit easier. I will share the Fondant recipe below.
DECORATING THE CAKE
What you require:
- 1 Kg Vanilla Cake (Use this recipe – just double the ingredients to get 1 Kg)
- Buttercream Frosting – Click here for recipe
- Fondant – Recipe below ( It’ll be divided into 5 parts & colored)
- Icing Spatula – To apply your buttercream
- Cake Board – I used a 10 inch board – my cake was an 8″ round cake
- Plastic Rolling Pin – for rolling out your fondant
- Fondant Smoother – to get a smooth surface after applying your fondant
- Small sharp knife – to help with cutting out different fondant shapes
- Food Colors – to color the fondant (Below are the ones I used):
- AmeriColor Super Black Gel paste – for the mouth, face accents & eye pupils
- AmeriColor Leaf Green Gel Paste – for the main base fondant
- Pradip Bright Red Powder Color – for the tongue
- Wilton Violet Gel paste Color – for the bandanna
Method:
- Make sure to make your fondant a day ahead – it’s easier to work with. For example; you can bake your cake on day one in the evening and make the fondant on the same day. It’s also advisable to color it on the same day; then wrap each of the individual fondant pieces with cling film and put in an air tight zip-lock bag or packing paper (this avoids drying out). Leave them overnight and they are ready to be used on day two morning (both cake and fondant).
- Level your vanilla cake and apply a crumb coat layer of buttercream. Make sure to smooth it out as best as you can, especially on the top. Let it set for about half an hour. For best results; I like to put the crumb-coated cake in the fridge (about 20 minutes) or freezer for about 15 – 20 minutes. It’s easier to apply the fondant after it has set.

Crumb coat the cake, then let it set. - As your crumb-coated cake is setting/chilling; knead your green-colored fondant to make it pliable and easy to use. This can take about 10 to 20 minutes. Ensure your fondant is not dry, it’s soft and pliable. Make sure it’s not cracking while stretched and can be rolled out quite thin. If you encounter drying out; you can choose to either warm your fondant a bit in the microwave for 5 to 10 seconds. You can also add a little bit of vegetable oil as you knead the fondant to make it softer, shiny and pliable. Knead each piece of fondant before use.

Knead fondant before use to make sure it’s soft and pliable - Take your crumb-coated vanilla cake; it should be ready to cover with fondant. Roll out your green fondant. (Measure the diameter of the cake and the sides & add a little bit more – that’s the diameter you’ll roll out for the green fondant e.g. Sides are 2 inches + 8 inch cake diameter of the cake; so roll out at least 14 inches or even 16 inches.) I rolled mine about 16 inches in diameter since I also wanted to cover up the board. Once it’s ready; roll it back onto the rolling pin, then gently place it over the cake. Make sure to start on one end of the board, cover the cake gently, then finish off over on the other side. Use your hands to wrap the fondant gently onto your cake at first – be careful to avoid air bubbles forming between the cake and fondant layer.
- Using a fondant smoother; smooth the top of the cake and get it as flat as you can, then slowly smooth the sides as well. Take your time in this process to spread the fondant out gently as well as smoothing it well.

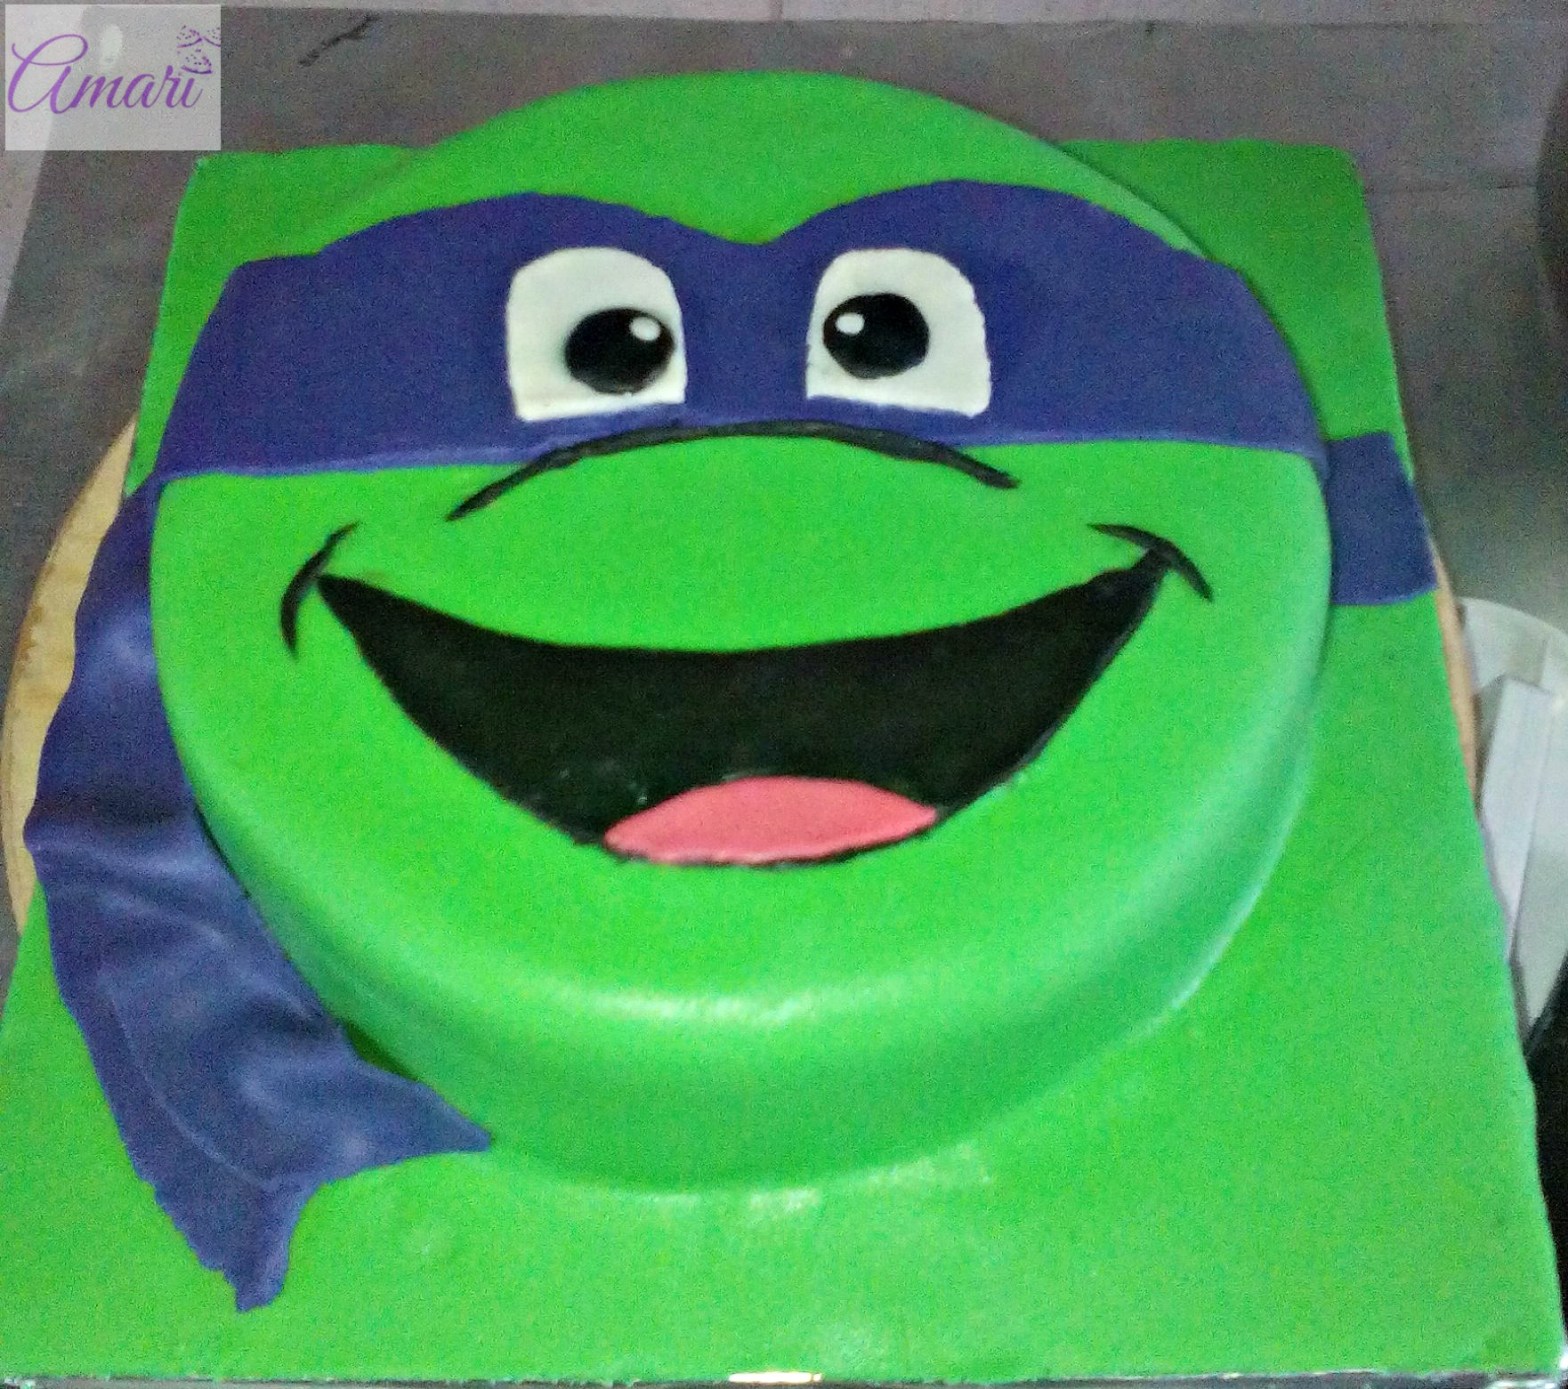
Once you place the fondant on the cake; work on smoothing it for a nice finish - When your base green fondant is nice and smooth on the cake and the sides of the board; start working on your violet-colored fondant. Knead it until soft and pliable.This is what you will use to make the bandanna for the turtle. The best thing to do is to have a template, drawing or another cake picture to guide you when carving out the different fondant shapes for the face. I used the one below; I modeled the face on the top right turtle – I was using violet though (I think that’s Leonardo ^_^ not so sure though – feel free to correct me).

Internet downloaded clip-art to use - Roll out your violet fondant and cut out a bandanna. Make sure to measure the diameter of the eye section (e.g. in my case 7 inch diameter) and the parts on the sides (2 inches on each side of the cake). When you’re satisfied with how thin it is and the right shape; brush a thin layer of water exactly where you’ll be placing the bandanna. Then carefully lay it on the cake and smooth it to ensure it’s secured.

- Now work on the flaps of the bandanna on the side of the cake as shown below and then place them on the left side of the cake. Make sure to create a bunched up, wavy kind of look for the side of the bandanna.

Finishing off the bandanna - Now take your white piece of fondant; knead it until soft and pliable and roll it out as thin as possible. You can now carve out the two eyes to place on the bandanna. (Try and cut it out as smooth as possible – mine was a bit rough on the edges ^_^ ) First start by testing the placement on the bandanna – once you’re sure; brush a little bit of water and then place the white pieces and smooth them on the bandanna. You will also need two small dots to complete the eyes.

Making the eyes ^_^ - Take your black fondant and knead it accordingly; then roll it out. Cut out two round pupils (to complete the eye), about a half inch in diameter; then cut out the mouth (see below). Place the two pupils on top of the white eye shapes you had placed on the bandanna; then take the two white dots you had made earlier and place them on top of the black pupils closer to each other – on opposite sides.
- Take 3 small pieces of the black fondant and roll out very thin strips/ropes to accent the end of the mouth (two pieces – each about an inch in length); and also to create the nose area as well (this one is a longer strip of fondant – about 5 inches in length).

Working on the face… - To finish off the face; knead the pink fondant, roll it out and cut out the tongue piece. When you’ve carved it well and made sure it will fit well; brush a bit of water and place it on the bottom center of the mouth. You’re cake decoration is complete!

Completing the face work ^_^ FONDANT RECIPE
Ingredients:
- Icing Sugar – 6 1/2 to 7 Cups
- Gelatin – 1 ½ Tbspn
- Cold water – 1/3 cup
- Margarine – 1 ½ Tbspn*
- Glucose syrup – 1 ½ Tbspn
- Vanilla essence(clear) – 1 tspn
- Corn starch (for dusting)
- Hot water bath (boiled steaming water in a medium bowl)
- Color – add quantity as you prefer (e.g. for a lighter or darker shade)
*(You can use white fat – I just prefer to use margarine or butter)
Directions:
- Sift the icing sugar in a plastic large bowl, create a well in the middle and set aside. P/S: You can sieve 6 1/2 cups first and keep the other 1/2 cup aside to use for dusting or when required to add if fondant is too soft.
- In a smaller bowl, measure the gelatin and pour the cold water on top, put aside and let it set for a minute.
- Measure the glucose syrup and pour into the small bowl with gelatin. Then measure and add the vanilla essence (or any other clear flavoring) and margarine (or the fat you’re using) into the same bowl.
- Take the bowl and put it into the hot water bath and slowly stir the contents until clear and well mixed into a liquid. You can also microwave these ingredients for about 10 to 20 seconds for the same result.
- Pour the syrup mix into the well in the icing sugar and using your hands, start mixing the icing sugar. Knead the mixture until it comes together well and forms a small ball. You may add a bit of icing sugar in order to make the fondant firm and soft.
- You can use it right away, or for better results; cover the fondant with cling film and set it aside for a day to age. If using right away; let it rest for about half an hour, then knead the fondant until smooth & pliable (10 to 20 minutes) – use corn starch to dust your work surface. Use the fondant.
- If you would like to add color; add a few drops of your preferred color and knead it into the dough, then let it age (resting a day or two). Check later to see if your color is as preferred, if not, you can knead in more color until it suits you.
For this tutorial: I divided the fondant two times:one half I colored green, then I divided the second half into three parts. One third I colored violet; the two thirds – one I colored black & the last third I split into two. One half I left white and the other I colored into a pink shade. (Lots of math and fractions , I know – but they worked ^_^)
I hope this tutorial is of help to you – if you do try it out, please share your results by commenting below please ^_^
If you know how to bake and decorate on a basic level; but want to take your baking & cake decoration game to the next level – sign up for our Intermediate Cake making and Decoration class (it includes fondant making). We also have very basic Fondant making taught in our Basic Cake making and decoration class. Click here to see the details of what is taught in that class.
P/S: We also have a Beginner’s Guide to Fondant Making Ebook. It offers our latest triple-tested Fondant recipe and tons of tips on fondant cake decoration including how to panel a cake. Click here to get full details of the Ebook.
Happy cake decorating! Make sure to share this link to your baking friends ^_^

Where u located …any intake frm January?
LikeLiked by 1 person
on Ndwaru rd; Riruta/Waithaka area. Intake for January will be updated by next week thanks. So just check the ‘Baking Classes’ page for the updates. Thanks ^_^
LikeLike
Hi Maureen your fondant recipe does not have glycerine like most of the recipes I have seen. I would like to try your recipe but I need your confirmation that I can still make without glycerine.
LikeLiked by 1 person
Hi there, fondant – just like many recipes in the baking world out there – doesn’t have a one-size-fits-all kind of formula. There are many variations of fondant out there, some with glycerin, some don’t use it – they use fat, others use marshmellows. And they all work, so just try this one; if it works for you, good ^_^ If it doesn’t you can always search for other variations as well. All the best.
LikeLike
Hi. I tried the fondant recipe and it worked really well. This will be one of my favourites.
LikeLiked by 2 people
Thanks so much for the feedback and so glad to hear that! ^_^
LikeLike
wow thats is owsome
please how will i make for a potrait of mary mother of Jesus
LikeLike
For now I don’t have that tutorial; when I am able to do it – I will update on this blog. Thanks
LikeLike
Will you please show me how gelatin look like? And where Will I get it
LikeLiked by 1 person
Please click on this link to see how it looks like and how much it will be from this supplier – Topserve Ltd = http://bit.ly/2GelatinTopSrve
LikeLike
Maureen am so happy, ua recipes r on point…… Thenx a heap dear
LikeLiked by 1 person
Very welcome Sophie, glad to be of help ^_^
LikeLike
How can I get the cake baking boo plus decorations including fondant?
LikeLiked by 1 person
Hi, you can send a WhatsApp message to no. 254701796688 (9am to 5 pm) for full details. But basically; you make payment to our Mpesa Buy Goods till no. 89736, then send email address to us (via WhatsApp or email: info@amaribakery.com) – and we’ll send you the ebook ^_^
LikeLike